Posts

Showing posts from 2012

End of 2012

Have a Happy New Year, Joyeaux Noel, Feliz Navidad, Froehlich Neue Jahre. End of the year, and end of the video download.   I am trying to close out 2012. So if you would like the Videos download please see the previous post. AS they may not be available at this price in 2013.  Also expect additional videos to be coming soon. Well worth the price. Also if you have gotten a solution - consider a donation.  That makes it inexpensive for all and worth posting the solutions.

Need Classes?

Classes forming for training in Laptop Repair. The first class for training will be in 2013.  More details will be forthcoming as I am working out the locations for these classes.  Cities under consideration. Dallas Chicago (area) Boston Bay Area (CA) Atlanta Seattle Classes will be 5 days covering laptop diagnosis, part identification, common problems and hand 'How To', Dead laptop, No Video, DC/USB Jack Replacement.  Since many tech become confused following circuits, this too will be covered. Class size is limited to 10, due to space. If you have questions related to this subject - Email Me The DC and USB port replacement is being covered is that many techs will spend hours and hours replacing what could be done in little as 15 min.  This increases your profitability. Many tech  are still trying to replace Dell jacks with a soldering iron and solder wick, or desoldering iron alone. Heat management - heating it up without burning the board or nearby pla

How to save your flooded laptop

This advice is for qualified technicians.  If you are not qualified, do not continue because you may cause even more damage How to properly clean laptop AFTER Flood or water damage. In most cases this will get your laptop back on, and if screen is damaged, you can use an external monitor to get your data off.  Backup immediately!! First I want to mention that this may or may not help.   Depending on the amount of damage done electrically. 1: Do not attempt to turn on your laptop if it has gotten water damage! 2: Remove the battery immediately 3: Disassemble unit completely. 4: Disconnect CMOS battery or remove coin cell. 5: Remove Hard Drive.  ( allow it to dry either by sunlight or air dry ) Do not reconnect HDD! , use USB adapter to connect it externally to known working unit.                                              Your data is more important than your laptop  or screen! In most cases your hard drive data should be safe if your unit was not on , or not in use

Advanced Users

The Blog use and method is quickly exceeding it's purpose. Advanced technicians should contact me

Home Brew Solution to Clogged Heatsink

Image
This is one part of why the DV Series fails, it is not the total solution and should be/could be additional help in keeping the heat vents clean . 2.5x2.5 inch intake vent (6.35cm x 6.35cm) If you get tired of cleaning out your heatsink fans to your DV series laptops you can try this 'homebrew' filter. this is done after you clean the fan and vents and the laptop already has been repaired or works.  Since the filter is on the outside of the laptop you can simply brush off the lint/dander with a brush after a couple of months use.  Or if you are often in your unit, it can be placed inside.  This does not solve the overheating problem, but reduces the frequency of cleaning the heatsink. Though it is recommended that you apply thermal compound annually to prevent the "NO VIDEO" issue related to these models. Only apply to your personal laptop. Cut filter to cover vent What is the filter made of? Simple - a used dryer sheet. Instead

Update on MOSFET Video in the bundle.

An update for individuals that purchased the video bundle. In the Extras bundle, the  video named DVMOSFETS.mpg   The initial problem with the board was no lights, no power.  After some diagnosis and replacing the MOSFETS on the front end the unit was recieving power and would loop, turning on, then off.  Clearing the CMOS and with a Cold Reset  it would not revive the unit. It was determined that the CMOS battery was also drained from sitting too long with a short condition. The CMOS battery should have a minimum of 2v.  Without a charge in the battery, the CMOS settings that are read from the BIOS chip are not saved or stored, the laptop will loop trying to retrieve & store these settings (which will never happen) because of a dead battery.  This is one item that I overlooked during my diagnosis, because usually the CMOS battery will last 3-5 years under normal use.  But when a unit has a shorted condition (or has sat for a length of time before repairing), the battery w

Following DV7 circuit paths

If interested in finding the power paths for the DV7 here is an animation for these models. here is an animation for techs to trace those paths more clearer. Click here

RE:ISO DVD or Extras

Mail sent to persons requesting the DV series  DVD/ISO.  The Extras Video is no longer included in the ISO purchase. After all the issues surrounding this, I have gotten a reply stating that the process worked and was downloaded in the UK (Thanks Mike).  If I have missed responding to anyone, please email HoosierNewman AT gmail.com. The ISO can be burned to DVD so that repairs can be watched on bigscreen or PC. An additional video disk is available covering other models: Testing DV 6000/9000 Mosfets and Power Circuit. Making a Modified Shim (not the same as Chinese or eBay shims) Dell Inspiron 1501 Power Problem Dell Inspiron 1545 DC Jack (complete disassembly and repair of jack) Dell Inspiron 1545 No Video issue (not reflow) Dell XPS m290 No Video issue Example: Replacing an LCD connector   (plays in chrome, downloads in IE) DV5 DC Jack These are step by step repairs and will continue to add more as the opportunity arises. Coming soon. Gateway PA6 17" - No

Planning Local Classes in Laptop Repair

After a number of offers, I am currently considering training classes in laptop repair.  (Here or there) The current available timeframes is Apr 23-27 and  Apr 30- May 4.  One location in Charlotte, NC and another in Greensboro, NC .  Dates and location have not been finalized, and this is dependent upon number of requests. Classes will be small 10-20 max.  If you need assistance with accomodations that too can be provided. The classes will include: Common Failures by product/mfg line Diagnosis/Troubleshooting Component Identification SMT Soldering Reflow Methods Part Replacement, Mfg Identification, and Cross Referencing MOSFETs and other SMT devices. Motherboard Trace Repair This is not a beginner class, and is recommended for technicians with previous formal training in electronics or computers. The another option will be to hold classes onsite at your shop in the US, and is available for techs with hands on instruction and demostated practices. Larger classes may be a

Trace repair on Macbook 2007

Image
Repair traces on MacBook 2007 - Previous tech attempted to remove Audio port on laptop and damaged traces leading to terminals on mainboard. The trace repair required a steady hand, 32ga filament wire to retrace the electrical path of the audio signals. After the traces were repaired they were coated with clear teflon insulating coating (this is important) so that they would not short against adjacent wires or pads that still may be exposed. The easiest way is to do the largest mass first. Connecting the wire to the terminal ring then expose a portion of the trace and tack solder wire filament. With the lower trace through-hole ,expose pad by removing enamel then tack the through-hole with solder (pre-tinning not necessary because copper easily accepts solder). Then tack solder the upper pad above the connector hole. Then insert jack. If the holes still have solder remaining, you may need to dremel the holes clear, removing only the solder and not drill the edges of the solder holes i

DVD ISO finally uploaded - Available

Update: I finally have a solution to the International formats needed for the DVD/ISO! So - Out they go Monday to international requests. Mike/Larry After a number of issues the ISO of The Laptop Doctor had been posted (4.2gb). Since the automation portion has not been completed. You will have to request further information and payment detail via email "Subject: ISO/DVD". Please do not request without subject. This is an early release I am still working out the details to have this done automatically. After returning from Paypal, a link is generated for each request, and since this is a new server/host I am not sure of it's speed, but I was promised a fast connection. The ISO videos are in the NTSC format (Region 1) and I have no way of knowing if PAL/SECAM machines can view these via computer. What's on the ISO? 1: How to Properly Reflow an nVidia GPU 2: Repairing DV6000 (Intel) No Power Issues 3: Repairing DV6000 (AMD) 4: Repairing DV Jack Issue 5: Shor

New Month - Project Prepped

As I had stated before- The video on demand domain is setup and I am transferring videos and testing, testing, testing. Some videos are currently viewable, but had to go through all of them to make sure the wording is correct and links works. So stay tuned. Repair videos that will be available (soon). How to fix F700 series (No Power & No Video How to make a modified cooling shim (nVidia GPUs) How to replace an LCD connector -(DV4,5,6,7 series) Cleaning the Heatsink Fan (DV Series) Dell Inspiron 1545 No Video Dell Inspiron 1545 DC Jack repair DV6000/9000 - No Video (Intel) DV6000/9000 - No Video (AMD) DV6000/9000 - No Power & No Lights (AMD) DV6000/9000 - No Power & No Lights (Intel) DV6000/9000 - No Power & Has Lights (AMD) DV6000/9000 - Power Supply shuts off DV6000/9000 - DC Jack repair The video format: MP4 Works best with IE (Not Chrome or Safari) this is an issue with security,host and layout - (not Chrome per se) How to test Mosfet ( Sample Page ) Click on the A

DV7 No POST & Blinking Lights

Image
This unit was thought to be a reflow and previous user or store overheats parts. So this cap that was to be seated on the South Bridge was sitting on the edge of it. Totally out of place. That is the primary reason I always look closely at the motherboard before attempting repairs. Parts get old, solder gets weak.

Reference Images

Image
Reference Images DV1000 Sparks Sparks and No Power/No Lights

DV9000 and DV5-1002NR

Image
Here is an example of a slow day. HP DV9000 -model not available because  I was brought the board only. An obvious capacitor short, and not sure if it was caused by liquid spill or shorted PC Card slot board. Customer advise to use caution before inserting the PC card.  Since the board arrived as board only, I cannot guarantee it was a spill or defective connector. Main Problem was - No Video Though PC Card Slot or Power Dist. circuit area Replace LCD Connector on DV5-1002NR Upon close inspection of this unit Pin 40 was broken and connector had to be replaced.  It was a delicate job, and heat management was needed so not to damage the plastic connector. The replacement was hand soldered to ensure alignment and durability. Main Problem was - No Video on LCD, External video works.

The Repair Videos

Ok I still have not answered all of the DVD requests. But I did come up with a solution. Create an ISO of the disk so that you can burn your own DVD.  Mike(UK) and LarryS(US) and any one else I missed.  Please email me direct (NOT ON BLOG). And I will put the ISO up. (MegaLoad is no longer an option) so I had to do things another way.

Imagine the number of vague questions that I get sometimes

How to correctly ask a question.  Remember this site is intended for shop technicians.  So if you work in another field and really have no clue to electronics, your answer may as well be in Greek, if you do not know what I am talking about.  So please direct your questions appropriately. Hope that clears up some details, that I am frequently asked. Clear Examples of Problems Model Number   DV9418 / DV6608 DV9000 is a series Works with Battery   will not work with AC Works with AC  will not work with battery Charge light   not on when plugged in Turns on Shuts off Runs but No Video Runs but Dim Video Only then can I possibly guess if I can answer your questions.  Not all of them may be answered.

New Month and Thanks

January was a busy month a lot of new. And donations were helpful, freeing me up to do record more projects. So as an added bonus for those that donated I will be setting up a Video Repair section - Via YouTube or another hosting site. There you can see various videos and exactly how I diagnosed and solved the problem.  Thought it might not be professional work it is clearly stated.  If you have donated and do not get the link, feel free to email me. (The volume of mail is quite high as well as me getting distracted on other projects). Why don't I post daily?   [see profile] Well I have other skills too -  Electronics is what I like because it is a challenge. This Blog Graphics and animation because it is interesting and creative. [ Youtube ] Websites because I have friends in need sometimes. Basic Sites Programming because sometimes things are not available that you need TCMS project History   because the past should be preserved. I found an old High School yearbook in

DV4-1255dx - No Video, Blinking lights on topside

Image
DV4-1225DX Needle in a digital haystack - numerous problems Damaged Coil Side view Problem described as Memory Slot Not working & No Video Since I had never seen this unit come on, with memory in slot 1 or slot 2 there was not much I could do other than thoroughly inspect the system fisrt. Damaged coil Top View 1: Found that a coil under the PC Card slot was broken.     Replaced and Test - No Fix Replaced When peeling back the plastic near the Video connector- looking close I notice a cap is stuck to the plastic. Very small ceramic cap that was hardly noticeable without magnification. Now- Where does if come from and where does it go?  What is it's purpose? Under magnification, I view the area where the smaller components are and see evidence of solder or tampering.  This appears to be the location of the missing/stray cap.    Since this is a multi-step repair... Back to the work bench to see if the problem i

HP G60 No Power- Blinking Power LED

Image
  HP G60 - No Power, Will not turn on, Will not charge This unit arrives with No Power Problem.  When plugging in the AC Adapter I notice that the Power LED is (steady) blinking. The Power button does not work and does not light the charge light, so I can diagnose this as a major POWER IN problem.  Inspecting the power section behind the DC Jack and the bottom side of the board.  Turning the board over, I notice a section burnt and a cap missing.  So- the first thing I do is remove the caps indicated as 1,2 ,3 in pictures. Then do a quick test- plug the power adapter back into the unit. The power LED no longer blinks.  Cleaning up the area shows me that the cap indicated by #3 had severely shorted and the frayed metal end was also shorting the #1 cap. Removing the solder from the pad, and the welded metal from the missing cap, I have a working surface area to replace the parts. These are standard ceramic caps that can be found on an old board and nothing unique about the

HP DV5-2035DX External Video, No Video on LCD

Image
Click for larger picture view DV5-2035  No Video, External video works fine A DV5 arrives with complaint-  Video shows on External but not internal video on LCD/LED display. Inspecting the unit near the video section,  the problem is immediately spotted as being a blown transistor. This transistor is one of the switching type that allows the video signal to be displayed/sent to the display. Without this part there will never be any video shown, except on an external monitor. Click for larger picture view Solution: replace blown transistor

Toshiba L455D - Previous repair attempt by another tech

Image
Toshiba L455D - Board Damage Ok so Monday starting off the week I get in a Toshiba L455D and say to myself "this should be easy" since I just had one last week and things went pretty fast. Taking the motherboard from the chassis I immediately see that it had been worked on by a 'hack', unexperienced tech.  Checking my previous notes to see exactly was was damaged I did a side-by-side comparison. The way this board arrived and parts missing- Click for larger view Then I realize that there are simply too many parts damaged and missing to even get the unit back to the way it should be.  So this is one that I will not attempt to repair simply because of the amount of time it would take, and the value of the unit. Solution: Replace motherboard . The way it should be with parts shown - Click for larger view

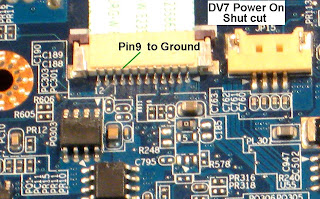
DV7 Power On By Pass (version 1) - TIP

Image
For the older version of the DV7 you can bypass having to connect the power panel by shorting PIN 9 to ground, this will turn on the unit.  Saving wear and tear on the ribbon cable and connector. This model was a DV7-1150US