Posts

Showing posts from July, 2010

Acer 5516 - Dead, No Power, No Lights

Image
Finally a breather before the storm came. (Load of work) This jack was damaged by drop and or push. The lead broke/shattered as if it was hit while running. Copper can shatter too, you know. This should be clear enough LarryS.

Acer 5515 Works off Battery, Charges, but will not run off AC

Image
This unit arrived working from a charged battery, but will not power on from AC.  My first thought was bad leg on the DC Jack, Easy job! Finally Upon opening the case and removing the keyboard I saw the beginning of the failure. Burnt MOSFET under the keyboard directly behind the battery connector. So took the rest of the panels off to see how bad it was. Out of a scale of 1-10 with 10 being the most difficult I rate this as a 7.5 because it was more annoying than difficult. The copper under the MOSFET was actually welded to the legs of the FET, heating solder would not break the weld. Click to see larger image The visual shows almost the worse case scenario for a shorted MOSFET. Burnt and totally unreadable numbers.  Seeing the circuit I surmised that it was an identical pair of chips but I had to verify against another motherboard to be sure.  Also there was a scorch mark under the keyboard, but it didn't affect the keyboard or any keys.

Compaq 6735b - Dead No Lights

Image
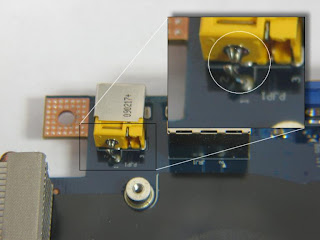
This was a strange cookie.  This unit showed no sign of life and was a weird design for power in button.  I have to admit this was a 'lucky' repair. While diagnosing where was the DC power, I discovered that a power MOSFET was open, No Power anywhere, no lights, no charge and stone cold dead. On the bottom of the board it was a mosfet FDS6676 that was open.  When I replaced it with a substitute I was able to follow the DC circuit, but it dropped off at the power button. So testing that area I noticed that when I put the meter positive on point on the board the light behind the pwr button would flash briefly. Recalling a similar experience where I had to modify another CPQ 6735 when they first came out/released. I thought I would try my luck again.  1: With the meter set to VOLTAGE and holding the meter's positive lead on this point, the unit would come on. My first guess was 47k Ohm. This worked but the laptop would not turn off, or would come on when it wanted

DV6000/DV9000 Lines in LCD and External monitor -unreadable

Image
A fairly common problem with this series is lines in the LCD and external monitor. Sometimes it will exhibit scrambled characters on the screen. Similar issue.  This is because the video memory has fail or lost connection and the addresses cannot be read properly by the system. The rest of the system may work but video is not proper and screen unreadable. Lines and streaks on POST screen Should show BIOS info and CPU info            This shows the step by step on how to correct this problem. There are other videos on YouTube dealing with the 'no-video' issue. Some are dangerous, others are goofy. I will be getting back to that production.  Not wanting to knock anyone for trying, but be careful, some of these guys are not techs or engineers and have no clue of consequences. 

Laptop Rebooting- DV6000, F700

Image
While working on a DV6000 today I decided I should also address other problems with these models while working on the DVD production.  As it seems this problem is also quite common, Rebooting, looping, restarting.  Never getting to the Windows startup screen. OK there are several causes of this scenario with the ribbon cable being shorted or defective.  The ends of the ribbon cable can lift away from the surface when inserted and shorting the lead from the adjacent wire.  Some times it will short and cause the wire to burn. Other times it will cause the REBOOT/LOOP issue.   Also verify that the Coin Sized CMOS battery has 2.5v- 3v, if not or voltage is low, all kinds of problems may present themselves.  Correct operating voltage is needed to read the CMOS data, or the data may be corrupt or deleted. How to test/bypass these? 1: Disconnect the PWR connector cable, and turn the system on with the remote control (if you have one).  Make sure the battery is good in the remote