Posts

Showing posts from 2011

Dell Inspiron 14R Spill

Image
This  Dell 14R had a water/coffee spill and blew some parts and pads from the laptop  motherboard. This image shows the resistor PR12 after removed from board. Shown here before cleaning This image shows how it should look, and the  original view. This image shows how the repair had to be  done.  Part of the pad was still visible, and the hole pad had enamel removed to allow connectivity to the pad and trace.

DV7 Power On By Pass - TIP

Image
The DV6000 and DV9000 series has a bypass jumper that you can short to turn on the unit without having to connect the power on button. Now the DV7 also has a method also.  this way you don't have to disconnect from the frame and makes it prone to breakage or scratching the plastic.

Toshiba L455D - Powers On Then Off

Image
Toshiba L455D Blink On then Off Light. Power light functions normally. Charge light functions normally. Does not run. Does not post. Turns on then shuts off. The unit powers on then after a few seconds- shuts off. This is was caused by a shorted MOSFET PQ10 that exhibited a full short 0Ω Since they were in a pair formation, both were replaced so the current level would be balanced.  The cost is so low, that it was not a consideration. Two AO4466 replaced with two AO4468 mosfets which were available.  AO4468 is out of production, but were found on an HP DV6000 near the Maxim [MAX8734/PU10] quad output power distribution chip.             (PQ31/PQ32 on DV6k) The coil PL3 was cracked in half, was not exactly sure if the coil would be defective, but the nature of coils is to push current within the electromagnetic field, so if the field is open the electrons may not go forward, tools did not allow the ability to verify. So it was replaced....

DV5-2155dx - No Video, Blinking lights on topside

Image
I will only report how I fixed it, not answer specifics related to why/how/what or "where can I get parts" questions, because I simply don't have the time to reply to the requests. This DV5 came in with no video display. The problem was a coil L6002 to the right of the GPU shield. The coil and/or pad cannot handle the 'bounce' current that flows through. Taking the coil out of the circuit path eliminates that problem.  Small inset image shows where the coil was and the old path of the circuit. Larger View Shows coil location 

Up Late

Up late trying to make sure everything works, buttons, answering questions that may have been missed. And printing postal addresses. After that last hectic week...

Sometimes it's something else

Earlier today I got my hands on an older Compaq M2000.  It was dead, no lights no anything. So checking the board (which is the same as the V2000 and the DV1000) . The front end MOSFET next to the power jack had bubbling on the surface (probably from overheating) And it was the wrong chip!? It was a SI4425 which has a lower current rating.  So I replaced it with the AO4413/FDS6679 series and tested again.  This time the charge light was on when the battery inserted. This told me that at least the unit was getting power. Then I remembered the common problem with caps on those models, so I started checking the caps. Sure enough I found the shorted cap on the bottom side near the rear of the DVD drive connector. OK replace that and turn on. Everything lights up, except the screen. No display on external. Hmmm - checking the GPU accidentally by touching it was !!HOT!! Used the crayon test, it made a small wax puddle on the chip. This GPU was definitely shorte...

Toshiba A75 - No picture on screen.

TOSHIBA A75 series are workhorses they will run and run.  The only problems I have experienced with this model  that is fairly common is the DC Jack fails, Overheating and onboard memory failure. Since onboard memory can cause the above symptom, that was on of the first things I tested. The memory turns out to be fine. Opening the unit I see that there had been a previous spill that had dried and and was on some important VLSI chips. The next step was to closely inspect the spots where the spill was and visually determine if it could be the cause of failure.  This depends on whether it was on any PCI or video subsystems.  As it turns out it was on the PCI subsystem.

Explanation of Terms

Some of the terms used by techs and myself: Dead: Means No Power, No Lights, No Charge Light.    Check DC Jack , test with known good battery No Power/No Lights: The unit will work from charged battery, but not from AC. Some light may be on.    Check DC Jack. When you move the charge plug with battery installed, the charge light may come on intermittently. This is caused by a cold solder joint on the DC Jack, or bad contact inside the jack.  No Power/With Lights: If you hold the plug at an angle, the unit will come on, but letting go of plug it shuts down.    Check DC Jack Will Not Charge Battery: Unit runs when plugged in, but will not charge battery. Or the battery only last 15min after charging all day.    Check Adapter - Generic or Wrong Amperag e Example -If you are using a 65w charger and trying to charge a DV9000 the battery will never fill up to it's maximum. Volts x Amps = Watts   18.5v x 3.47a = 64w ...

Some questions that were asked.

Image
A few individuals have asked questions direct, and I wish to clarify some items.  It is best when you post on the blog that way it can also answer several hundred other readers questions. Question  1:  How do you check the (brown) ceramic caps. Answer:  Simple, I use a standard Ohm meter in the Resistance mode.  Since the biggest problems with caps when they fail is the become either a direct short, or they will never store capacitance (open).  The meter reads in the ohm mode by sending a small amount of electricity through resistors and report the difference in Ohms. Test with leads RED on one side and Black on the other.  One direction will give you a high resistance ~2000Ω and then reverse the leads on the meter and the other direction should give you Infinity. This is an OK capacitor. If you have a very low resistance or 0 (zero) Ohms, the cap is shorted. Why?:  I started small just repairing for friends and family, after a number of ...

DV9000- Turns on- Shuts off

Image
Symptom 1:  Unit runs for a while then turns off Symptom 2:   Unit turns on, turns off immediately This unit arrives after another tech had attempted repairs.  Numerous screws missing from base and incorrect screws used in reassembly.  Complete tear-down and disassembly. After powering the unit up, I noticed that the heat sink copper was discolored [darkened] which is a sign of high heat.  Upon close inspection I noticed a kink in the heatshrink material covering the wires for the fan wires, so I strip back a portion of the insulation and the red wire was broken, and the black wire was only 2 strands. Yellow and White wires were OK.  Rather than replacing the fan (which is in short supply, and costly) I repaired the broken wires with solder and insulating them so that they would not short each other or the frame of the HS fan, which is negative ground. Screw also missing on the exterior frame that holds the heatsink downward onto the base, th...

Compaq C500 - LED's Flash Rapidly, and never posts or starts

Image
Unit arrives with following symptoms: Flashing LED's on the power panel, and the power  LED on the front edge flashes continuously. [See video] When I connected the DC source with the battery inserted, I thought the charge light would come on as it should regularly. Since it didn't and flashed at the same rate as the other LED's this told me what area to check. When checking the MOSFETs PQ5, PQ49, and PQ4 all of them were of the same type [FDS4435] but PQ49 had a short in both directions with meter set to DIODE mode.  This indicates the FET is shorted.  So that was the first thing to replace and test again.  When I replaced the PQ49 FET and plugged in the charger (with battery inserted) the charge light came on, as it normally should.  Upon powering the unit, it posted normally on external monitor.  Since it was a power in/charge circuit I assumed everything else was fine and reassembled the unit.  All items work. USB/Wifi and other peripher...

Gateway laptop M-Series - Shuts off immediately [M-6750]

Image
This Gateway M- Series  6750 arrived with the following symptoms:  Turns on, but shuts off after about 5 sec.  The lights would flash, then shut down. Counting seven (7) flashes before shutting off. Attempting a cold reset of the BIOS/CMOS it would not complete the reset, and continue to do the same thing.  Because it would not write the CMOS, that shows me the first area to check.   Under close inspection of the board, I notice a coil is burnt, and the number is not visible/readable. [PL20] The burnt coil had also burned the motherboard layer under itself and would require cleaning and insulating the second layer. This was done with a small piece of mylar tape that was placed under the coil before soldering it in place. This repair was a quick repair and not making a complete mask and copper pad for the exit contact of the coil. Works and sufficiently insulates the second layer of the groundplane. MOSFET PQ54 was also replaced simply because the cos...

Compaq C500 - Bad Video Memory

Image
Compaq C500 Arrives with bad video.  The information is displayed just not properly. External LCD also displays same thing. This is related to the video memory of the unit and not the GPU in this case.  This will require a low temp reflow. Because video memory is often not glued to the mother board, low heat has to be used so that the chips become separated from the motherboard. If that happens it will require special equipment and higher cost to the customer. If you unit does not have dedicated memory for video, then it would be the chip that addresses (provides the row and column information for the GPU) the video memory.   This is usually a large chip directly to the side or near the GPU. Typically on Intel models rather than AMD.  Middle picture shown after reflow.   Link   Video showing screen issue  at Youtube  if you have issues displaying from blog.

Acer 17.3" Shuts off when moved or touched

Image
Newer Acer 17" Model [7736Z-4809] laptop arrives after being repaired.   The initial repair was a DC jack. Seems that the jack didn't last long and was sold to a reseller. Physically broken and replaced.   After replacement, the unit would charge and run.  Minor tests completed based upon user diagnosis.  However, if the laptop was moved when on/running, it would shut off immediately, and the lights would go off. (Charge and Run lights).  When the unit was moved or tapped at the area on the right where logo stickers are, it would shut off -everytime. Thinking it may have been a ground issue with the case, I tapped the motherboard after it was removed, and still presented the same problem.  Repeated on/off testing located the area where the open circuit was occuring.  The PCI controller chip (indicated in square).  Since this model did not use high temp glue to hold the chip to the motherboard, the best reflow method for this model woul...

Dell 1545 - No Power & Shorting Power Supply

Image
Dell Inspiron 1545 arrives with No Power, No Lights and short Power Supply. This unit arrived with because the customer thought it was a DC Jack repair because it was shorting out the power supply everytime it was plugged in. So it did not matter which power supply was used it would still short out.  My way was to simply separate the power panel board from the laptop and see if it was the laptop having a short or the small power board. When the small board was removed, the power supply would still short out.  Looking into the jack itself, and testing from POS to NEG shows no short on meter. So tracing the path from the POS terminal on the back through the on board diode showed continuity.   Reversing the meter's leads it shows 1 Ohm. So this tells me that the diode was shorting the unit.  Extracting the power board only took 3 screws, and not having to remove the whole motherboard made things simpler and a quick repair. Then lifting the power board ...

RE: HP GPU Video information

TARGET DATE: APR 15 ~ MAY 1st I just came up with a solution to those that are in dire need of the video. So instead of making a 'Hollywood' masterpiece, with fancy labels and jewel cases etc.  I will be doing a single Step By Step instructional video from start to finish.  This will  make the overall cost lower, and faster completion, as well as provide list of items needed and source for US customers. (Not many countries outside USA use 120v so the heat gun here would not work there) but the other items are readily available in most places.  So the contents will be a simple Instructional DVD by US Mail available through Paypal so that there will be no questions about me having your credit card info and such, or the complete kit, with all the parts for a D-I-Y project. The contents will be for 1 repair, but the rest of the items (*secret stuff) will be available for multiple repairs incase someone wants to do this at a shop on a regular basis.   If ...

Dell Precision M290 - Lines in Video

Image
Currently in video preparation for posting solution of the Dell Precision M290 with lines in video. Which will be added this weekend 20 Feb.  This will be a Step-by-Step video. Diagnosis Removal Preparation Repair Cleaning Test Reinstallation The problem is the same for nVidia. Solderballs not making contact. In this case the solderballs are located in the video memory. See other video for similar problem.  This is a screenshot from the video.

Dell XPS No Video (2)

Image
This is unit #2 Dark Blue cover This unit arrives with a request for DC Jack repair. the jack repaired and unit plugged in to test and shuts off immediately.  So I had to inspect inside. Opening the unit to get to the GPU portion to begin diagnosis or repair. Because you have to remove the heatsink before the motherboard, and after removing it what I see is the 'Worst Case' scenario of how a GPU should look.   In an effort to get video working someone put balls of solder under the heatsink to apply pressure on the manufacturers solderballs under the GPU making contact with the motherboard. Along with way too much thermal compound. Though the idea was good in principle material used does more damage. The solder not only contacted/shorted resistors and jumpers on the top of the GPU but removed a number of them (probably inside a ball of solder).  Those extra small resistors and jumper sets, clock speed and memory size information for nVidia.  But the unit was...

Dell XPS No Video

Image
This Dell XPS comes in with 2 others, so after months of none, now three in one day. Various issues and  different problems. Shift-Click to see larger image The first one has a pink shell. Exact model number not copied yet. It has no video but starts like it will go into P.O.S.T. but never does.  The LCD don't not light, or flash briefly (which indicates the inverter works). Removing the keyboard and top I noticed this burnt plastic mark next to one of the connectors for the LCD.   With motherboard removed, the plastic cover was slowly removed and noticed a coil with pads damaged so there was no electrical path completed. Removing the damaged coil and cleaning the area, required me to also remove a few mm of laquer from the mobo.  This exposes copper which will become the 'new' pad completing the circuit. Test and backlight and video appears on LCD. So the problem was an open path by blown coil.  

Tips on Testing MOSFETs

Image
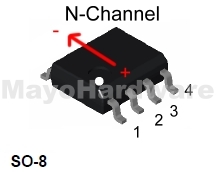
Imagine the flow direction Source to Drain This is how I test FETS  What I will try to do here is to provide a little insight on how to test  MOSFET's in circuit the easiest way I can think of. Essentially the FET acts as a switch, and the GATE either opens or closes the switch. When power is supplied to Pin 4 (usually the GATE) it will either open or close depending on the type of MOSFET it is. The arrows shows the direction for reference when using a meter to test.   Setting the meter in DIODE mode. On the N-Channel FET place the NEG lead on Pin 6/7 and the POS lead on Pin 2/3. You should get a reading of some value ~100 to 500 or higher. Imagine the flow direction Drain to Source On the P-Channel FET place the POS lead on Pin 6/7 and the NEG lead on Pin 2/3. Again you should get a reading of some value ~100 to 500 or higher. The reason I say pins 2/3 and 6/7 is ...

DV5-1124 Motherboard replaces -1125

Image
Insistent Customers and Laptop Repairs -Arrrrg!!! What I had to do to get  a laptop back to the customer before factory heat-sink is replaced. DV5-1124 motherboard without heat-sink This customer was without their laptop for a couple of weeks [from another shop] waiting on the correct motherboard  to arrive. When the new motherboard arrived, it did not come with video memory management unit (mmu) heat-sink. After running a few minutes, the mmu would overheat and the unit would shutdown to protect the chip. An irate customer could not do without for another 3-5 days waiting on the factory heat-sink. So a minor custom heat sink was made to 'hold-off' the customer until it arrived. It consists of a copper pad, plastic sheeting (on underside of pad) with a cut out hole. The copper bridge soldered to the pad was to act as a heat bridge to transfer heat to the original heat-sink.   This is not a recommended repair , only a temporary fix.  Ther...

DV6000 Powers On/Powers Off [Intel]

Image
DV6500/DV600 SE series Unit arrived with a common issue among INTEL Dual Core units.  Powers on then shuts off immediately.  Though there can be several causes of this symptom, usually the case is 'cheap'/bargain  ceramic capacitors. When shorted they can also short the AO4914 chip shown in the center of the Zoom-Out picture. In this case the cap marked with the red X is shorted. When removing it split in two horizontally. The two caps on the on the other side has also been known to short previously.  This can also lead to NO Charge, or never reaching 100% charge, or Working on AC but not on battery.  So on the Intel models I check all the ceramic caps in the Power In section first. (well at least after a visual of USB ports and other obvious problems- power plug/charger etc...) Steps Taken: Check Ceramic caps in power in section Locate shorted parts (also checking AO4914 Dual Channel MOSFET) Replace capacitor Test Reassemble Test Again (also wit...

DV 2500/DV2000 SE Will not P.O.S.T./No Power

Image
Click to Enlarge HP DV 2500 14.1" Intel Dual Core - Dead DV2500 model number  and of the DV2000 Special Edition series that exhibits power problems. The indication of power problems were shown by the ring-light on the DC Jack. Since the LED uses the +5v line this points to a problem in the low power section of the unit. There were no other symptoms other than not powering on, or rapidly shutting down. Sections also controlled by the +5v  Power ON Button  LED's and panels  DC Jack Power indicator (ring light) After close examination, found that the USB port was shorted.  This was a clear visual short. PIN 1 is +5v for the USB which is Vcc or 5v for powering device that is plugged into port.  With a dead short the power controller (usually a MAXIM IC) will not allow the rest of the unit to turn on. Though making troubleshooting a little more challenging, it protects the motherboard from additional damage as well as other parts. Steps tak...

For Advanced Techs

Image
Click to Read QRCode After answering questions from average users it appears that things may need to change to better serve techs.  Though previously stated, this is a help site for techs, I have been inundated with questions from users.  Stay tuned.